Showing posts with label greenhouse sensation. Show all posts

Friday, 5 June 2015

Top Tips & Jobs for Gardeners in June

Make the most of the warmer, wetter weather in June with our Gardening Angels top tips for June Gardening Jobs.

1. Sow & plant out tender vegetables

It’s a great time to plant out your marrows & courgettes outdoors as they will thrive in warmer growing conditions now the risk of frosts have passed.

Top Tip: When sowing your seeds, simply place them on top of your compost & push them down until they are covered. By growing marrows and courgettes in a Patio Allotment Planter you can ensure your plants are kept perfectly fed & watered & there’s even space to create your own salad garden in the central planter!

2. Create Your Own Salad Garden
Grow your own fresh summer salads in just 6 weeks with a self-watering Salad & Veg Planter. Perfect for growing radish, lettuce, spring onion and leafy salads from seed.

Top Tip: Once harvested, sow more salad seeds in succession to ensure a continued harvest throughout the summer. This is a great way to make use of your growing space and ensure you never run out of salad for your next BBQ.

Read our Salad Growing Guide for more top tips

3. Sow Beetroot, Broccoli & Carrots

Sow these tasty treats now and get ready for a bumper harvest later in the year.

Sow 15-20 seeds per 1 metre row then, after 3-4 weeks of growing, thin plants to 10-15 per row and start your second row.

Top Tip: If growing in a Quadgrow Root Veg Planter, spread seeds evenly, as this will provide room for them to grow into.

4. Help Pollinate Your Tomato Plants
Lightly tap your tomato plants or spray them with a fine mist of water.

This will help disperse the pollen, helping you to ensure a good fruit set on your tomatoes.

You’ll soon be on your way to bigger yields of your favourite tomatoes.

Read our tomato growing FAQ for more handy hints and grow your own bumper tomato harvests.


5. Prepare to Harvest

- Potatoes
Early Potatoes planted in February or March should may be ready for harvesting.  As the potatoes are buried, the best way to check if they are ready is just to dig them up and have a look for yourself!

If you’re the proud owner of a handy Potato Harvesting Scoop you can dig out potatoes from the compost without any risk of stabbing your spuds.

Top Tip: Your Potatoes will continue to grow steadily in the compost for several weeks, so only dig out enough for 1 meal at a time. This way, you’ll find yourself harvesting bigger & bigger potatoes as the weeks go by!

- Garlic & Spring Onions

If your Garlic & Spring Onions foliage is turning yellow and dying, they’re ready to be harvested, by simply pulling them up from the ground.

Did You Know? Once the foliage is all but completely keeled over, the leaves will have transferred all of their energy into the veg, which is why they will have appeared to die.

- Early Carrots

When the tops of your Early Carrots measure between ¾ and 1 inch, they’ll be ready to harvest. As with harvesting potatoes, pull up Carrots as and when you want to eat them.

Top Tip: Try to Harvest in the evening. This will help to reduce the risk of attracting carrot fly which can infect the plants roots causing damage to your prized crops.


6. Grow Some Windowsill Herbs

Even if you have your own plot or greenhouse, it’s always worth growing a few herbs on your kitchen windowsill.

Top Tip: The biggest problem herbs face is over and under-watering. Being poorly watered can affect the taste of herbs, not to mention also killing off your plants. 

A self-watering Herb Planter will ensure your homegrown or shop bought herbs are kept perfectly fed & watered for up to 2 weeks at a time; so no more wilted, tasteless herbs!

Plus, you’ll have a delicious garnish available the whole year round!


7. Say Goodbye to Crop Munching Slugs

June’s changeable weather can only mean one thing…Slugs & Snails! Warm and rainy weather creates the perfect breeding conditions for these slithering pests.

Top Tip: Surround the base of your flowers & vegetables with Organic Slug Pellets, which create an irritating barrier that slugs and snails hate to cross, sending them off to munch elsewhere. An added bonus: they are pet safe and child safe!

8. Prepare Summer Cuttings
Annual bedding plant cuttings from your Hydropod Cuttings Propagator should have started rooting. When roots are established, take your cuttings and pot them on into 9cm pots. Tap down pots to remove air pockets, then water them.
Top Tip: Put your potted cuttings into a Heated Propagator to help maintain moisture in the compost.

Favourite June Cuttings: Try taking cuttings from shrubs, such as lavender, hydrangeas and forsythia now you’ve got some extra space in your Hydropod Cuttings Propagator. Read our essential plants cuttings guide and grow more of your favourite decorative plants.


9. Keep Greenhouse & Polytunnels Ventilated

On hot days, open vents and windows in your greenhouse to ensure your plants don’t over heat.

If you’re using a greenhouse fan heater, you can switch to summer mode, which will circulate air around your greenhouse, reducing the risk of mould and fungal growth.

Top Tip: ‘Dampen Down’ your greenhouse to manage humidity. Simply water the floor of your greenhouse in the morning.

Throughout the day, the water will gradually evaporate, maintaining moisture levels in the air.
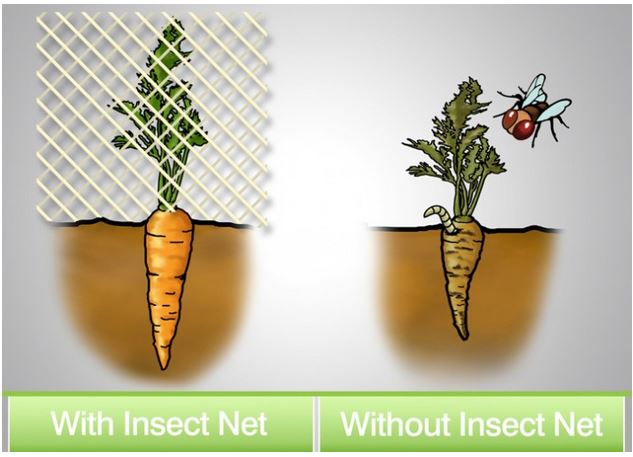

10. Protect Ripening Fruit

Cover Ripening fruit with a protective mesh netting.

Perfect for preventing pests from nibbling on your prized plants whilst still providing your plants with all the access to air, water and light they could ever dream of!


Friday, 31 October 2014

Top Ten Handy Frost Protection Tips

Frost – it’s pretty, it’s bracing and it can wreak havoc on your prized plants. Here are some top tips from our Gardening Angels to keep frost off your plants and provide the ideal winter plant protection.

1. Use Mulch

Mulch is a composition of organic material such as straw, compost, bark chippings or decaying leaves that can be applied to the base of outdoor plants to retain soil moisture and protect roots from the cold for the ideal tree frost protection.

To avoid rodents taking up residence in mulch, wait until mid-November to apply, as decreasing temperatures will have already forced these pests into hibernation elsewhere.

2. Reduce Watering

Plants do not exert as much energy over winter and will retain water for longer. Outdoor plants will generally not need watering throughout the winter. With indoor plants, water less frequently to avoid overwatering and waterlogging soil, as this can lead to root rot.

If you are using an automatic watering system, reduce the volume and frequency of watering. Try to water plants in the morning so that they have time to absorb the water, as any excess water could freeze overnight.

3. Get Ripening

Ripen your fruit and veg off the plant with a ripening sheetDon’t let frost ruin fruit and veg before they’ve had a chance to ripen! Pick anything that has yet to ripen, such as late-blooming chillies and tomatoes, before the frost hits and ripen it off the plant.

Enlist the help of a banana, apple or fully ripened tomato to assist with ripening. These release ethylene that speeds up the ripening process. Put these together in a bag or cardboard box (or a sock drawer for the traditionalists!) and check up on them every few days.

Alternatively, a ripening cover can also be used to cover your plants, allowing air and moisture to reach your plants whilst retaining heat that will speed up the ripening process.

4. Keep Leafy Veg Healthy

Leafy crops, such as salad leaves, chard, chicory and parsley, can last well into winter with the right frost protection. Cover plants with frost protection garden fleece or a cloche to keep it safe from cold and frosts. These can also be grown indoors, so consider moving your seedlings and plants to an electric heated propagator.

5. Use Frost Protection Fleece

When frost hits, it can freeze the water in plant cells and damage their cell walls. When the sun rises and defrosts the leaves, plant cell walls can completely rupture! By wrapping plants with a plant frost protection fleece, also known as horticultural fleece, you can protect them from the cold whilst still allowing light, water and air to reach them.

6. Protect Plant Roots from Freezing

Plants in pots are particularly vulnerable to frost damage as the Cold weather can be devastating for their roots. If roots freeze, they will be unable to take in any water, causing the plant to die. By wrapping plant pots in a Fleece Plant Jacket  you can protect roots from temperatures as low as -8°C.

Group potted plants together and wrap with bubble polythene or straw for additional plant frost protection. Cover them as a group with a Frost Protection Cover or even bury the containers themselves in the ground up to the rim to make the most of the natural soil temperature.

7. Harden Off any Veg for Winter Planting

Grow your own plants indoors with a Vitopod Electric PropagatorWhen planting up vegetables over winter, such as leeks or brassicas that have been started off indoors with a heated propagator, ensure they are hardened off before planting. ‘Hardening off’ is the process of gradually acclimatising a plant to its growing environment to avoid it going into shock. As temperature decrease, this process must be carried out more gradually.

8. Avoid Scorch Damage

Remember, it’s not just frost you need to look out for! Freezing winds quickly dry out plants and soil, causing scorch damage. Set up a windbreak using either mesh or gardening fleece to help keep trees and plants healthy. Don’t forget; plenty of mulch around their bases will also help retain soil moisture.

9. Don’t Feed Pests

Protect your garden from slugs with organic slug pelletsWinter is a tough time for garden pests, but don’t let them ravage your plants in their quest for survival! Whilst snails will hibernate during the winter, slugs can still be found slithering around whenever the temperature is over 5°C. Organic slug pellets and Slug and Snail Shocka will repel slugs from plants by creating an abrasive barrier; so they will be forced to seek sustenance elsewhere!

10. Keep your Garden Debris Free

Keeping a garden tidy serves many purposes. Fallen debris, such as twigs, branches or dead leaves, can cause damp damage to underlying plants, so use ahandy leaf picker to move these to your compost heap. Should winds pick up, a tidy garden leaves fewer projectiles to be blown around, minimising the risk of damage to other plants.

If you have any tips or questions about winter frost protection, frost blankets or general garden care, feel free to call us on 0845 602 3774 or email us atinfo@greenhousesensation.co.uk. Our Gardening Angels are always happy to help and love to hear about your experience of winter growing!

Wednesday, 22 October 2014

Hardening Off in a Propagator

The Vitopod Heated Propagator is ideal for overwinteringOnce your plants have made it through winter, the time will come when they must leave the safety of their heated propagators and moved to their final growing place .

Before moving plants out of your heated propagator, you will need to harden them off. “Hardening off” is the process of acclimatising your plants to live outside of a heated environment, encouraging them to develop stronger, waxier leaves that can cope with natural conditions outside the propagator. This must be carried out gradually to avoid your plants going into shock.

You can start hardening off your plants when night time temperatures reach 5°C; although the higher the temperature, the easier the process will be. If hardening off at 5°C, you still need to implement some additional protection such as a frost protection fleece. A frost protection gardening fleece will keep the plant safe from any sudden drops in temperature and will allow you to plant outside sooner.
A seedlings true leaves just coming through

The decision for when to harden off plants should be based on the time of sowing/planting rather than the development stage of your plant. Young plants are less likely to tolerate sudden changes in temperature, so these should be left a little longer. Typically, when your plant has developed its true leaves it will be ready for hardening off.

Plants grown in warmer environments, such as an Electric Heated Propagator, will need to be hardened off more gradually, as these are used to higher temperatures.

The duration of the hardening off process can vary depending on what you are growing. However this is the typical process for hardening off in an electric heated propagator:

Stage 1: Leave the lid off your propagator during the day
Recommended Duration: 7 days

Stage 2: Leave the lid off your propagator all the time
Recommended Duration: 7 days

Stage 3: Remove plants from the propagator (ideally move to greenhouse or mini greenhouse, or outside with plant frost protection)
Recommended Duration: 7 days

Stage 4: Transplant your plants in their final planter

A Quadgrow planter makes a great final home for your seedlings
In addition to these steps, it is important to consider the other changes that your plant will have to adapt to and how you can prepare them for this.

- Your plants will be experiencing greater levels of direct sunlight, so try to move your plant to a sunnier spot gradually throughout this process to lessen the shock.

- Aim to plant out on an overcast day as this will minimise the risk of your plants wilting.

- If planting outdoors, protect young plants from slugs with some organic slug pellets and keep hungry pests away.

Now your plants will be ready to grow and your Vitopod Propagator will be free for sowing your springtime seedlings!

If you have any questions about hardening off, or if you’d like to share any advice from your previous experience, feel free to call us on 0845 602 3774 or email us at info@greenhousesensation.co.uk. Our Gardening Angels are always happy to help!

Friday, 4 July 2014

Growing in Water - Hydroponics Uses & Origins

Hydroponically grown Tomatoes
Competitive & adventurous gardeners love growing in water with our Vivigrow and Rain & Drain Planters which use the hydroponic technique where plants are grown in water. There are some fascinating origins and uses behind the technique of growing in water so we thought we’d share a few with you...

Floating gardens of the ancient Aztecs

The Aztecs were a nomadic tribe who were driven onto the marshy shore of Lake Tenochtitlan, located in what is now Mexico. They had no land on which to grow crops, so they learned how to build rafts of rushes and reeds and grow vegetables, flowers, and even trees on these rafts which they called Chinampas.

They dredged up soil from the bottom of the lake and piled it on the rafts. The soil was rich of organic debris that released large amounts of nutrients which fed the abundant crops of vegetables, flowers, and even trees planted on them. The roots of these plants grew though the floor of the raft and down into the water. This is much like the root growth you will see in our Vivigrow Planter. Watch our short video showing early root growth of our tomatoes growing in our Vivigrow.

Sometimes the rafts were joined together to form floating islands as long as two hundred feet long. Some Chinampas even had a hut for a resident gardener.

The Aztecs eventually developed a large and powerful empire but they continued to maintain the rafts. In the 16th Century when the Spanish arrived in the New World in search of gold, they were fascinated by these islands of trees seemingly suspended on the water. Chinampas continued to be used in the area into the nineteenth century.

Hanging gardens of Babylon

Many garden writers believe that the hanging gardens of Babylon, one of the seven wonders of the ancient world, were grown using a sophisticated hydroponic system into which oxygen and nutrient rich fresh water was regularly pumped.

Egypt & Antartica

Ancient Egyptian hieroglyphic records dating back to several hundred years B.C. describe the growing of plants in water along the Nile without soil. The extreme environmental conditions found in the Arctic make the process of growing food a formidable challenge. Four months of solid daylight, four months of total darkness, and unpredictable winds and temperature changes make growing extremely difficult. However, in Antarctica, successful harvests are achieved on a daily basis.

Astrastronauts & Military

NASA have been trialing systems growing in water and now astronauts are likely to be fed on long flights using food originating from crops grown in water. In World War 2 the shipping of fresh vegetables to overseas outposts was not practical so both the American Army and the Royal Air Force opened hydroponic units at military bases. Many millions of tons of vegetables grown without soil were eaten by Allied Soldiers and Airmen during the war years. After World War II the military command continued to use hydroponic growing methods. The United States Army had a special hydroponics branch and in 1952 it grew over 8,000,000 lbs. of fresh produce in water.

Our Vivigrow & Rain & Drain Planters

The Vivigrow is a ‘hydroponic’ growing technique and our very own founder of Greenhouse Sensation was one of the pioneers of hydroponics. He developed the Vivigrow so that this technique of growing in water in a soil-less planter could be adapted for home/greenhouse use on a smaller scale. The beauty of the Vivigrow planter is that the planter pumps a constant stream of water & nutrients over your plants’ roots, which encourages your plants to take up more water, nutrients and oxygen compared to if you were growing in soil. Watch our founder harvesting a mass of chillies grown in our 3 Plant Vivigrow Planter at the end of the growing season.

Our Rain & Drain Tropical Planter has been designed by our horticulturists to replicate the watering & feeding conditions needed by tropical plants. The Rain & Drain Planters inclusive water timer ensures your tropical and exotic plants such as bananas, ginger and papaya are fed & watered several times a day without ever over-watering. Pebbles are used in the planter instead of soil and a small pump waters the plants several times per day ensuring the plants have access to everything they need for stronger healthier plants and bumper harvests. Watch our founder breaking ginger harvest record.